
Challenge Project


Finally on Friday, my project "Seasons" for the Hello Dollies challenge was ready for presentation on Saturday... as usual, last minute touches were needed. I decided on a "flat doll" project, for this challenge which was to "create your own fabric" to make a doll from a basic pattern provided. I thought the stump doll pattern lent itself easily to the flat doll idea. I had been working on the idea for a long time, making all sorts of different fabric, most of which was rejected and has since found other uses. I finally settled on four bits of  machine embellished  and embroidered fabric to complement a piece of space dyed commercial fabric on which I had stamped face images.


 Trying not to use anything other than what was in my stash, I chose a neutral coloured fabric for the background and gave it a bit of depth by going over the surface with a black fabric pastel with a textured mat  underneath. My original idea was to have these dolls appearing to be standing under an archway, so I used a photo from a sandstone advertisement and with the fantastic technology of my computer, printer, and Lesley Riley's Artist Transfer Paper with a bit free form machine embroidery, the arches ended up looking a lot like stone.
The final piece was quite different from my original concept, which started out with a tree as the central  image and a connection between the arches. I did make a tree, but didn't use it as it gave the whole project too many focal points. I have another idea for the tree!
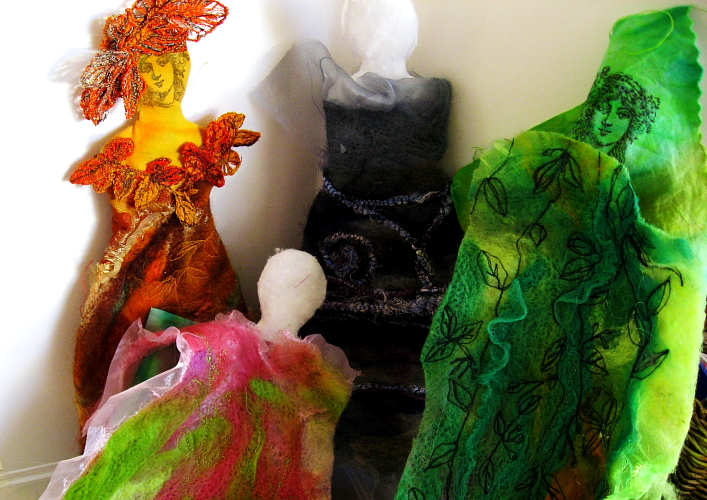
Although I had this ready for the presentation, I am planning perhaps to have some branches entwining the arches and replacing the  green felt back with some "seasons" themed poetry or sayings printed onto fabric. Still making those decisions... any good ideas?

Comments

Popular posts from this blog

Too Precious to Waste

 Stitched tea bags/ old doily "tea lights" - Wilma Simmons  More than a year ago, a decision was made.  The annual exhibition of NCEATA ( Newcastle Creative Embroiderers and Textile Artists) 2015-2016 will have the theme "Mottainai". Mottainai in Japanese refers to more than just physical waste (resources). It is even used to refer to thought patterns that give rise to wasteful action. Grammatically, it can be used in Japanese as an exclamation ("mottainai!") or as an adjective phrase ("it feels mottainai"). There is no plural form. The collection of mottainai things could be called mottainai koto ( もったいない事 ? ). As an exclamation ("mottainai!") it means roughly "what a waste!" or "Don't waste." [2]  A simple English equivalent is the saying "waste not, want not." A more elaborate meaning conveys a sense of value and worthiness and may be translated as "do not destroy (or lay waste to) that

Fish and Sticks : Art Dolls

This week I've been working on fish and sticks ....  The sticks are the message stick art dolls which were very popular, attracting some attention and a few orders at the Wise Women exhibition. Each of the message stick dolls are from the Wise Women series, each with her own personality and  message of wisdom, handwritten on a handmade timber tag. I gather the sticks during my walks around my neighbourhood and the tags are made from special bits of timber, some collected by me or  my husband or from off cuts gifted to us  from another doll making friend whose husband makes bagpipes. These dolls start off very simply with a wrap around a stick, in the general shape of a body. 'Naked" message stick dolls - strips of wadding wrapped around found sticks.   Then I usually wrap other layers of fabric, wool, and/or fibres, over which I do some simple embroidery. I sculpt  or mould small face masks for these dolls. I really like using "sari ribbon" as wrapping str

Wednesday's Child /2

Work in Progress - 3 of the 193 for "Stitched Up"- Wilma Simmons   The work for the "Stitched Up " Project  continues. See the previous "Wednesday Child" post for the background to this art project celebrating the 150th anniversary of the Newcastle Industrial School. I have been documenting the progress of my work, so I thought it might be interesting to share some of the early stages of the "stick dolls" ... Here are some of the beginning steps.. Sticks collected while walking the bushland in my neighbourhood  Drying and getting rid of any insects - oven heat 75 degreesC for approx 1-2 hours.  Trimmed and cut if necessary  Ends sealed with matte sealing solution.  Drying  - solution goes on white but dries clear.  First wrapping - foil to create a body shape  Second wrapping - stretch fabric.  Third wrapping - fabric strips  Some stitching - more stitching and embellishment to come.  Follow thi